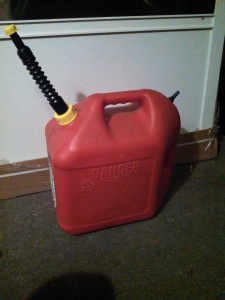
 By combining fuel savings programs with the recent plummet in fuel prices, it seemed like a perfect time to expand our home fuel storage. For us though, the prospect of fighting with 5-gallon gas cans almost seemed like more trouble than it was worth. Fortunately for us though, after watching a YouTube video and buying a few simple supplies, my husband was able to modify our gas cans so that we’ll never dread using them again.
Maybe some of you have gone through this. You want fuel on hand for your car, your lawn equipment, your generator, or a rainy day, but you hate messing with slow-pouring, hard-to-use, frustrating gas cans. We used to be “those people”; we kept a can or two of fuel around the homestead, but we almost never rotated it out because of sheer dread. It’s different now though. I look forward to trips to the gas station, especially when fuel savings programs allow us to save even more.
How He Did It
First, we watched the video How to Fix a New Gas Can on YouTube. The video was entertaining, but more importantly, it gave us clear, easy-to-follow instructions that helped us modify our gas cans.
Next, Fred went shopping. He got:
- an EZ-Pour Replacement Gas Can Spout from our local Rural King Supply
- an Irwin 3041002 Speedbor Max 5/8-inch Spade Bit, also from Rural King Supply
- a Slime 4 Way Valve Tool from our local Autozone, and
- some Slime Rubber Tire Valve Stems, also from our local Autozone
If you watch the video, valve stems that required drilling a smaller hole were used. Those valve stems work, clearly. Fred got the valve stems that required a larger drill bit as a matter of personal preference though. He liked the fact that they weren’t as long as the valve stems that required drilling a half-inch hole, and it’s worked out great for us so far.
Also, in our experience, those EZ-Pour spouts make gas cans easier to use (even if they’re not modified), so we’ve been slowly trying to replace all our gas can lids with the EZ-Pour variety.
Fred found it quite easy to duplicate the procedure from the video. Combining that procedure with the EZ-Pour replacement spouts has worked beautifully!
The Results
Before the modifications, it would take something like seven minutes to empty a 5-gallon can into our Kia Sorento. The EZ-Pour spouts made it easier, but Fred and I always dreaded the chore. When we tried the first modified can though, we were stunned!
We did experience a technical difficulty with the first can. There was a bit of a learning curve for the whole procedure, so we ended up dumping some fuel on the ground that first time. The first issue that resulted in us dumping fuel had nothing to do with the modifications; the spout wasn’t screwed onto the gas can properly. The second issue, however, wasn’t one that either Fred or I had anticipated. The modifications were so effective that fuel started pouring out of the gas can spout before Fred had gotten it into our gas tank.
As a result, we learned two valuable lessons that first time. First, we learned that if you get the gas can spout into the tank you’re trying to fill BEFORE you remove the valve stem cap, you won’t dump fuel on the ground because it’s not coming out of the spout before you’re ready for it. And second, we learned that a four-hour soak in a strong Simple Green solution before laundering will remove the smell of gasoline from your clothing. (The initial spill got gas on my husband’s favorite pair of lined pants and his favorite pair of gloves, so I was determined to figure that one out.)
In the end, it takes us about a minute and a half to empty a 5-gallon gas can. I’d say that’s not too shabby for a process that took just a few parts and about five minutes of Fred’s time. The time that we’ve saved already has made it well worth it, not to mention the lack of expletives and risk of property damage that occurred with old, frustration-filled process. I couldn’t be happier!
